


The first thing you have to realize about Facebook: nothing you put on there is truly private. Yes, you can control how users see or don’t see your profile. But every time you ‘Like’ a product or even look at a page, the company itself is taking note. This doesn’t mean that someday Facebook will malevolently release your every click to the world. But it’s also not your private diary, and what you do on the website gets collected and cataloged. You should always keep that in mind when you’re using the service.
That said, Facebook is a great way to stay in touch and share small and big moments with family, friends and assorted other connections. The key is making sure you’re presenting the most appropriate profile possible to each “Friend.” So let’s go over the various settings you can change to ensure pictures of your wacky jaunt to Vegas don’t end up at the top of your boss’s News Feed.
Facebook has retooled its privacy settings time and time again to make them more user friendly, so customizing your settings is a fairly straightforward procedure. It’s an important one, though, since Facebook tends to automatically opt you in to new information sharing unless you go through and manually adjust the settings to the level of transparency you want.
Check your current basic privacy settings
When you log into Facebook, in the top right hand corner there are two different ways you can assess your privacy settings. If you push the lock icon, you open a drop-down menu that shows “Privacy Shortcuts.” From here, you can make a few key changes to your settings.
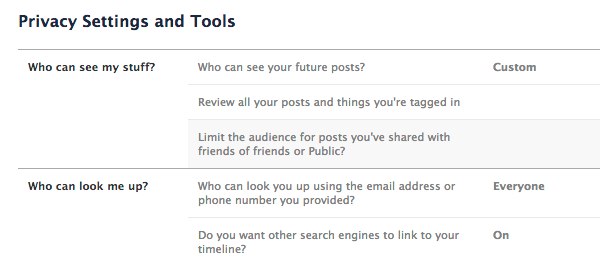
Who can see your future posts?
In this section you can limit exactly who sees your updates. That may be a little too restrictive, but at the very least click on the Custom button in that section and make sure your posts are being posted Publicly (unless you want them to be.) You can also place your Facebook Friends in lists and restrict your posts to those lists. But this option affects all your future posts and it may be better to restrict updates to certain lists on a post-by-post basis instead of all your updates.
Review all your posts and things you’re tagged in
This is a great way to make sure that wild bachelorette party didn’t make it onto Facebook, whether that was last weekend or years ago. Since others can tag you in updates and photos, and these will show up in your timeline when your boss or others are browsing it, it’s a good idea to review what others have tagged you in. You can always remove the tags if you find something you’d rather not be shown to all.
Limit the audience for old posts on your Timeline
It is important to change the settings for your old posts. This requires a separate action beyond limiting who can see your future posts. You have to click on the box that says “Limit Past Posts” to change the audience from public to just your friends or another options. This is important because your posts from before the Timeline function was rolled out will be public unless you go to this section and limit them. You can limit them all in one go with the click of a button, or you can manually go through and change the privacy settings. I recommend just limiting them all, since going through past posts will take hours (or, if you were a heavy Facebook user in its early days, weeks).
Who can look me up?
When you signed up for Facebook, you provided an email and possibly a phone number. Since the social network service is all about connecting people, it allows others to find you on Facebook if they know your email or phone number. However, if you don’t want to reconnect with old friends that way, or are getting spammed, this section allows you to restrict who can use that tool from Everyone to Friends of Friends or just Friends.
Do you want other search engines to link to your Timeline?
Your Timeline may not be as private as you imagine. Search engines such as Google and Bing may be showing your updates and pictures in their search results. If you want to stop them from doing so, this is the option for you.
This basic settings button covers some major privacy categories, but it’s not adequate if you want to make sure you’re in control over what gets shared.
Customize all your timeline settings
Now that you mastered the basics, go down to the next section “Timeline and Tagging.” From there, you can control exactly who sees what on your timeline, who can post to your Timeline, and who can tag you in photos and posts. To check how people see your timeline, you can type any user’s name into “View As.” It’s a quick way to double-check that your boss doesn’t see your vacation pictures.
To customize your timeline settings, click on the button in the far right corner to reveal a drop down menu and select “Privacy Settings.”
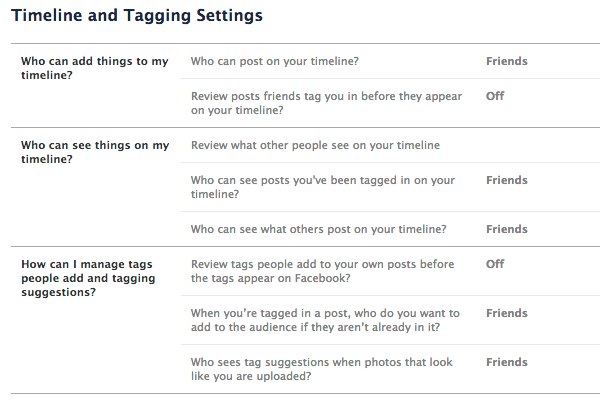
Who can post on your timeline?
It’s default set to Friends and the only other option is to only allow yourself to post on your timeline. This gives you the most control over what appears on your timeline.
Review posts friends tag you in before they appear on your Timeline?
If you are concerned about getting tagged in a photo that you don’t want all your friends on Facebook to see, this is the setting for you. Once enabled, you’ll have to manually approve any photo or posts you are tagged in before they appear on your Timeline. Note that this only affects Timeline, those updates will still appear in searches, News Feed and other places unless you un-tag yourself.
Review what other people see on your timeline
As we mentioned above, it’s a perfect way to check that your mother or boss won’t see what you don’t want them to.
Who can see posts you’ve been tagged in on your timeline? & Who can see what others post on your timeline?
These give you a great deal of flexibility with options ranging from Everyone to Friends of Friends to custom lists. Using these two in conjunction with manually approving what photos and updates you’ve been tagged in will go a long way in keeping prying eyes away from more sensitive Facebook updates.
Review tags people add to your own posts before the tags appear on Facebook
This is an important option if you are concerned about a photo popping up on your timeline. This applies only to photo tagging by your Facebook friends. You’ll always be notified if someone who’s not your friend tags you in a photo,
When you’re tagged in a post, who do you want to add to the audience if they weren’t already in it?
This one sounds more complicated than it sounds. Often a Facebook friend of yours will make a post and tag you in it. The option here allows all of your Facebook friends to see an update or photo you’ve been tagged in by someone they aren’t friends with themselves (the friends of friends function.) You can not only block it so you remain tagged, but none of your other Facebook friends see that update, you can also limit who sees that update to certain groups of friends or outright block certain Facebook friends altogether using the Custom option.
Who sees tag suggestions when photos that look like you are updated?
Facebook uses face matching technology to suggest who you should tag in photos. It will only suggest people that are on the user’s friends list. If you don’t want to show up as an option when your friends are tagging photos, set this to No One.
Blocking
If you want to take steps to keep people away from your profile, this is the section for you.
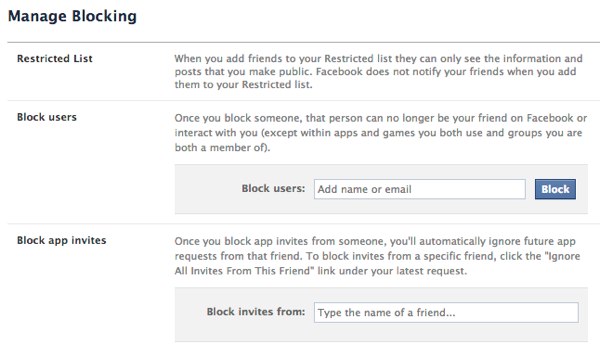
Restricted list
If you don’t want to de-friend somebody but you don’t want them to see all of your information, you can add them to the “Restricted List.” This means they can only see your public information, but they have no way of knowing you’ve limited their view. Unless they happen to see someone who isn’t restricted browsing your profile. But that’s probably not going to happen.
Block users
You can also just straight-up block somebody. This means this person cannot be your friend. This is an excellent setting if you have stalkers or other people consistently bothering you. Note that this does not stop them from interacting with you in apps, games or groups you’re both a part of.
Block app invites
In addition to blocking and restricting people from your profile, you can also block app invitations on a user-by-user basis. So if your Aunt Jackie keeps bombarding you with FarmVille apps, you know what to do.
Block event invites
Tired of your nephew inviting you to his New York City raves every weekend? Typing the name of the Facebook user into this section will stop you from seeing any future event invites from them.
Block apps
Some apps and Facebook games are great fun at first, but after a while you want to drop them. You can remove the app or game (which we step you through in the Apps you use section below) or block the app, which means it can no longer contact you or get non-public information about you through Facebook. If you are getting emails from the app, though, you will have to use the “unsubscribe” link at the bottom of the email.
Customize your app privacy
After you finish adjusting the Blocking section, click over to the “App Settings” section. It’s not quite as obvious as changing your Timeline settings, but Apps often have a lot of access to your information and they can do things you might not want them to – collect data about your location, post on your Timeline, etc.
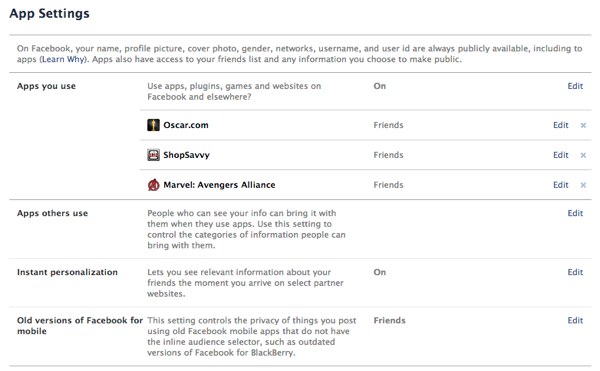
Apps you use
Clicking “Edit” next to a listed app will give you all sorts of controls including who can see that you are using the app to removing the app altogether. If you are just looking to remove the app, you can simply click on the “x” to the right of the “Edit” button.
Apps others use
This is the part where you can control what apps find out about you when you are the friend of the person using the app. You can choose exactly what information apps can pull from your profile in 17 different categories.
Instant personalization
Facebook provides profile information about you to outside sites to “personalize your experience.” That’s code for looking at your profile to deliver ads and content they believe you’ll be more interested in. Sites listed include Bing, Yelp, Zynga and others. If you don’t want these outside sites to pull your profile Facebook, click off the checkbox in this section.
Old versions of Facebook for mobile
If you use an older version of Facebook mobile (such as outdated versions of Facebook for Blackberry), you won’t be able to select who can see your updates when posting from that app. You can set it here instead.
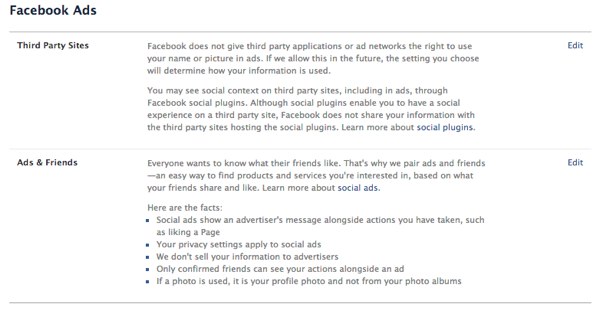
Customize your ad settings
Facebook is now a pervasive marketing and advertising tool and all sorts of businesses want access to your preferences so they can better target you. It’s kind of impossible to use Facebook without leaving some sort of trail of breadcrumbs for advertisers, but you can reduce this in a couple of ways.
First, go to your “Ad Settings,” located right under “App Settings.” If you don’t want Facebook to use your preferences in ads, make sure to change your “Ads & Friends” and “Third Party Sites” settings to “No One.” That means your name won’t get used in an ad for something that you’ve liked. However, this won’t prevent sponsored posts from companies you’ve liked–those items that appear in the News Feed, not ads–being sent with your name. And, you’ll still receive sponsored posts from companies your friends have liked.
And if looking at targeted ads gives you the heebie-jeebies, you can dial down the frequency of the ads by manually hiding stories by each company that targets you. It’s a cumbersome task but it will allow you to get rid of ads that are particularly annoying. You can do this by clicking the small “x” in the upper right corner of an ad.
Taking these steps will help you control who sees your Facebook page, but you should check every so often to make sure the privacy settings are the same. Facebook is gearing up for a News Feed redesign that might have an impact on the settings.
This article was written by Katharine Knibbs and originally appeared on Techlicious.
More from Techlicious: