


If you’ve just purchased an Android phone, congratulations. By going Android, you’ve opted for raw functionality over simplicity, for customization over absolute user-friendliness. Android is a powerful platform, but only for those who take full advantage of all its tricks.
To help get you started, here’s a guide to tricking out your Android phone, whether you just bought a Samsung Galaxy S 4, HTC One or a budget Android handset from your local prepaid carrier:
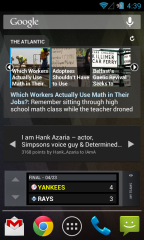
1. Get Some Widgets, Organize Your Home Screen
Widgets are an easy to way to put information and quick commands front-and-center on your phone. Here’s my most recent list of favorites, and here’s another list for good measure. On most newer phones, you can add widgets by going to the main app launcher, then swiping over to the widgets section. Some phones let you add widgets by holding your finger down on a blank part of the home screen.
Once you’ve got a solid collection, try to organize them in a logical way. For example, my main screen has just the weather, favorite apps and a fast way to reach my wife (more on that next). Then I have one screen for quick actions like note-taking, bookmarks and navigation shortcuts, one for news and information and another for phone settings.
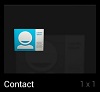
2. Give Yourself a Spouse/Significant Other/BFF Button
I want to give special attention to Android’s built-in 1-by-1 Contact widget (or the “wife button,” as I call it), which serves as a command center for talking to that special someone in your life. Add it to your home screen, and with two taps you’ll be able to call, send a text message or write an e-mail. (Update: Some HTC phones, such as the HTC One, only include a 4-by-4 Contact widget. But there is another way: Press and hold down on your home screen, and you should see a drop-down list with “Widgets” as the default option. Change this to “Shortcuts,” then select “Person,” and select the contact you want to add.)
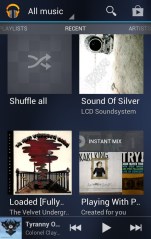
3. Set Up Google Play to Stream Your Music Collection
Just because your music collections is in iTunes doesn’t mean you can’t have your songs on Android. To bring music songs over from iTunes, you could use an app like DoubleTwist, but I prefer streaming my music from Google Play, freeing up space on the phone for more photos, videos and apps.
Just install the Music Manager software on your computer, and tell it where your music library is located. The software will match your collection to Google’s own library for free (similar to iTunes Match), and will upload any songs it can’t match. Then, you can use the Google Play Music app for Android to play your songs. The app can also download albums and playlists for offline listening.
3. Use the Google Play Website to Install Apps Remotely
The next time you find a good Android app suggestion on the web (here are 25 of them), don’t bother taking out your phone to download them. As long as you have visited Google Play on your phone before, and have connected your Google account, you can remotely install apps through the Google Play website. Just click the blue “Install” or “Buy” button on any app page, then select your device from the drop-down list. The app should appear on your phone shortly thereafter.
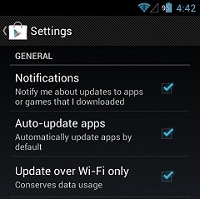
4. Set Your Apps to Update Automatically
Keeping your apps up to date on other platforms can be a hassle, but on Android, you can set apps to update automatically. Just go to the Google Play app, hit your menu button, and go to Settings, then check the box for “Auto-update apps.” You may also want to check the “Update over Wi-Fi only” box to avoid going over your cellular data cap. Keep in mind that if an app changes its privacy permissions, you’ll still have to update it manually.
5. Get a Gesture Keyboard
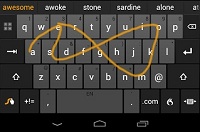
On Android, you are not bound to the software keyboard that comes with your phone. If you aren’t using a gesture keyboard, like Swype or SwiftKey Flow, you’re missing out. Check out this video of how gesture typing works, then spend a solid week or two giving it a try. Once you get used to it, you’ll never want to go back.
You’ve got a few options for gesture typing on Android. It’s possible that your phone may have a gesture keyboard included, but the quality of these versions can vary. Your best options are to buy SwiftKey ($4, or free trial) and enable Flow after installation, or buy Swype ($1, or free trial). Both apps will walk you through the setup process when you open them for the first time.
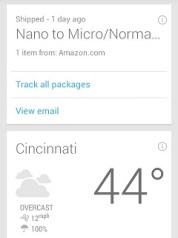
6. Set Up Google Now
Google Now is a virtual assistant built into newer Android phones. It attempts to provide information automatically based on where your are, what you search for and other information. For example, if you’re at a train station, it will alert you to when the next train arrives. And once it figures out where you work and live (based on the phone’s location), it can warn you about traffic on your commute. It can also hook into Gmail to provide information on flights, track inbound packages and remind you of upcoming events.
To enable Google Now, open up the Google Search app and go into settings. Flip on the switch for “Google Now” to on. You can also tap the the Google Now line in settings for more options, allowing you to fine-tune the types of information that show up.
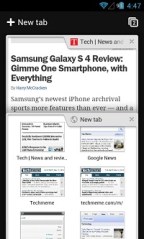
7. Download Chrome (If You Don’t Have It)
Even though Chrome is technically the default browser for Android, some phone makers have deluded themselves into thinking their own browsers are better. Don’t believe it. Chrome is fast and simple, and if you use Chrome on your computer, the mobile app will automatically keep your bookmarks in sync.
If your phone doesn’t come with Chrome, pick it up from the Google Play store. Occasionally, you’ll see a prompt to choose which browser to use (for instance, when opening a link through Twitter). Whenver this happens, select Chrome and hit “Always,” and you’ll never have to deal with an inferior browser again.
8. Get Text Messages on Your Computer
On Android, several third-party apps will allow you to read and respond to text messages from your computer or tablet, using your existing phone number. I rounded up a few of them in an older post, but my favorite is MightyText. Just install the app on your phone, then follow the instructions on MightyText’s website to access your text messages on your desktop browser or your tablet.
9. Get Comfortable with “Share”

In certain apps, you might notice an icon resembling a “V” or a “<” character, sometimes with arrows pointing outward. This is the Share button, and it’s designed to let any two apps on your phone communicate with each other.
For instance, the Share button will let send interesting web links directly to your social networking app of choice. If you’ve written something in text editor, the Share button will let you send those notes by e-mail or save them to Dropbox. If you have a read-it-later app like Pocket, the Share button lets you save articles without ever leaving the app you’re in. Get comfortable with the Share button and you’ll save yourself lots of time.
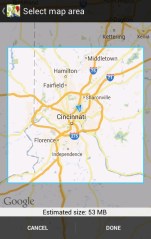
10. Download Maps for Offline Use
Internet connections fail. Mobile networks get congested. But you don’t want that to happen when you’re relying on GPS navigation for directions. Go into Maps on your phone, hit the menu button, and select “Make available offline.” Pinch or zoom to select the map area you want to download, then press “Done.” You should store a map for where you live, and store some more before you travel. Even if you don’t have a data connection, you’ll be able to see your GPS location marker in Google Maps, so this trick is especially helpful for navigating a foreign country without a data plan.
11. Connect to a PC for Fast Photo Transfers
One nice thing about Android is that you’re not locked into a program like iTunes for moving files on and off the phone. On the downside, transferring photos or other files requires just a little more know-how.
After plugging your phone into a PC’s USB port, look for it in your computer’s file browser. You’ll likely see a folder called “Internal Storage.” Click on that, then look for the folder called “DCIM.” You’ll find all your photos in here, possibly in another folder called “Camera” or something similar. Mac users, note that you’ll need extra Android File Transfer software to make this work.
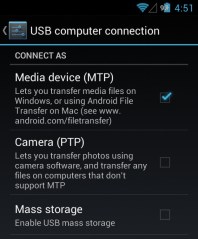
Alternatively, when you plug in the phone, look for a notification on your phone that says you’re connected by USB. Tap on this notification, and select the option to connect as Camera (or PTP). This is a good option for Mac users who just want to get to their photos, rather than the entire Android file system.
12. Back Up Photos Automatically
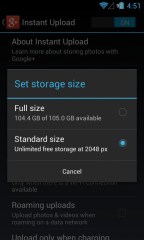
Android offers a few ways to automatically save your photos online, ensuring that you’ll still have a copy even if you lose your phone. The easiest way is through Google+ (don’t worry, it won’t share your photos unless you decide to do so later): Open the app, go into Settings, then tap “Instant Upload.” Flip the switch at the top of the screen, then adjust the settings below. Setting the storage size to Standard will allow unlimited uploads. You may also want to only allow uploads while connected to Wi-Fi, and only when the phone is plugged in.
If you’d rather not use Google+, Dropbox and SugarSync can automatically back up your photos as well, but with limited storage.
13. Get an App for Remote Find and Wipe
Unfortunately, Android doesn’t include a “find my phone” feature out of the box. To keep your phone secure in case it gets lost or stolen, you’ll need to download a third-party app.
Android Lost isn’t pretty, but it’s free, and offers lots of remote control options for your phone. For instance, you can display a message asking whomever’s got your phone to bring it back, or set a lock screen code. Another option is Cerberus. It’s a cleaner app and lets you locate your phone on a map, but it carries a one-time fee after a one-week trial period.
14. Take Advantage of Refunds
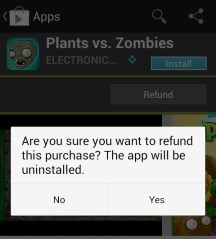
Any time you pay for an Android app, you have 15 minutes to try it out and get your money back if you’re not satisfied. That’s not a lot of time, but it’s enough to poke around the app and make sure it suits your needs. Being able to get a refund is especially useful if you’re looking for something specific, and the app’s description doesn’t tell you exactly what you need to know. It’s also a lifesaver if the app doesn’t work with your phone for any reason.
To get the refund, just go back to the app’s page in Google Play. As long as you bought the app within 15 minutes, you’ll see a “refund” button. The app will uninstall, and you’ll get your money back.