


Today, nearly everything involved with running a household can be done electronically – paying bills, doing taxes, sharing photos. Even the kids’ artwork can be photographed into a digital collection. Is it time to consider getting rid of the home filing cabinet to go completely digital?
The reasons to go paperless are compelling: free up square footage, save time finding documents, have redundant secure backup, save trees, and make your home office fully portable. And with banks and other service providers beginning to charge fees for paper statements, you’ll also save money.
But most of us have concerns.
- Is it safe and reliable? Yes, with appropriate backup. And digital files are less vulnerable to loss from theft, fire and flood.
- What about taxes? No problem. The IRS accepts digital filing. It’s not necessary to keep paper copies of anything related to your taxes, per the IRS, as long as you have an “electronic storage system” such as a PC with reliable backup. And if you are ever audited, you can just send the relevant files on a USB drive, rather than photocopying and boxing up paper files or having an agent come to your home.
- Is digital extra work? No more work than paper.
In short, the biggest legitimate objection to going digital is the loss of paper itself – something physical that we can touch, mark on, and stack in piles. And piles. Time to begin.
What you’ll need
A strong backup system is required – either an external backup drive (we recommend the WD My Cloud 2TB Personal Cloud Storage, $141 on Amazon) or cloud storage (like Google Drive or Dropbox) or better yet, both. Other necessary tools are a fast document scanner, a flatbed Multi-Function Printer (MFP) for scanning bulky items, a paper shredder and a program that will turn all those scanned documents into PDF files, the standard file format for archiving documents.
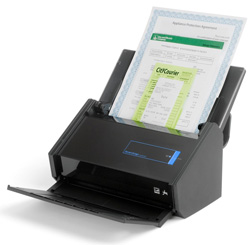
For the document scanner, invest in one like the Fujitsu ScanSnap ix500 ($450 on Amazon), or its little cousin the Fujitsu ScanSnap S1300i ($250 on Amazon). This may sound like a lot to spend, but it will pay for itself in the time it saves you. Without one, you might just find scanning so onerous that you abandon the whole idea of going digital.
The Fujitsu scanners handle two sides in one pass, 25 pages per minute, in color. Drop a stack of pages in the document feeder, and they will be scanned and ready to file. The scanning software automatically straightens and enhances the image on the fly, combines pages into a single PDF, and eliminates blank pages. You have the choice to output in common formats like PDF, JPEG, Excel or Word.
For the Multi-Function Printer we recommend the Epson Workforce WF-2540, $90 at Amazon. Its flatbed scanner is great for files that are attached together or even your kids’ artwork.
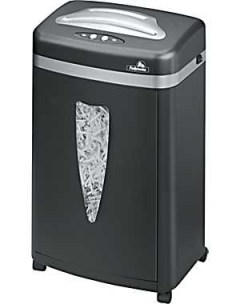
For the paper shredder, we like the Fellowes Powershred MS-450Cs micro-cut shredder, $199.98 on Amazon. Its level 4 security rating means it’s safe for your sensitive documents. Plus, it’s compact, powerful and has safety features in case your hand gets too close to the shredder mechanism. For a more compact model, we like its smaller sibling the Fellowes DS-3 Cross-Cut Shredder, about $72 on Amazon.
For the PDF writing program first check your scanner and MFP to see if it’s built in to their software. If not, check to see if you have Adobe Photoshop Elements. That will turn JPEG files into PDFs. If you still need a PDF writer, check out NovaPDF ($20-50 on novapdf.com) which does it all cheaply or CutePDF (free at cutepdf.com) for the super slimmed down, but free option.
Establish your digital filing system
The key to making this process easy is setting up a simple workflow that becomes habit. A good filing system ensures you can find everything later, which is another IRS requirement. You must be able to produce your records upon request, just as with paper.
Where to store
It’s best to store files in your main PC folder where you keep everything, such as “My Documents”, so you’ll never lose track of them. Check to make sure your backup system supports that location, otherwise go with whatever it requires.
Organization
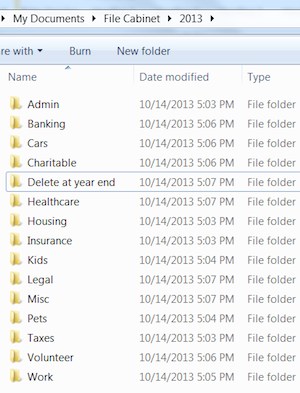
Create a folder system on your PC that mirrors your physical file cabinet. You might try chronological folders for each year, and sub-folders within them for categories like banking, taxes, healthcare, insurance, housing, legal, pets and family members. “It’s a good idea to have a current year digital tax folder,” says Debra Boyce of Strand Boyce Associates, CPAs. “Then, you can put documents into the folder throughout the year. For example, if you pay your taxes online, save a copy of the receipt in PDF, and store it in your current year folder as a reminder when preparing your tax returns next spring.”
Naming documents
The default names of scanned and downloaded files may work for you, but for better searchability, change them to something logical like “VisaBill 2014-05”. If you want even more robust searchability, investigate the sophisticated tools that come with your high speed scanner, such as full text indexing and batch tools for renaming or tagging.
Establish your backup system
If there’s any chance you’ve fallen behind on backing up, now is the time to make it top priority. Don’t just take our say-so; the IRS requires that digital records be well maintained with “reasonable controls to prevent … alteration of, deletion of, or deterioration,” … in other words, a backup. [Source: IRS bulletin PDF, Page 10, section 4.].
There are two ways to back up: in your own home on an external drive, and to an online service “in the cloud”. It’s your choice, but consider both, as they serve different purposes.
| Backup Drive at Home | Online/Cloud Backup Outside Home | |
| Cost |
|
|
| Pros |
|
|
| Cons |
|
|
| Best Use |
|
|
External hard drive
An external drive plugs into to your PC or home network and provides fast storage/retrieval of your content. Network-attached storage (NAS) has the advantage of being accessible by devices on your home network, for example for other family members’ backups or streaming photos to your smart TV. As an added benefit, it can be a personal “cloud”, letting you access your documents through the Internet even while away.
We recommend the WD My Cloud 2TB Personal Cloud Storage, $141 on Amazon, which will provide shared storage for all the devices in your home. For backing up a single computer, go with a standalone drive, such as WD My Passport 1TB Ultra drive, about $79 on Amazon.
Online backup
Online backup services encrypt and back up your data to the Internet. In case of something catastrophic in the house like fire or theft, the content will be safe. Our picks for the best online cloud syncing servicescharge a subscription fee in the ballpark of $60-$100 per year (under 5GB is often free). If you have a huge amount to backup (over 250GB), CrashPlan offers an unlimited storage option.
The initial upload to the cloud may take days, or for some rare users, weeks, depending on the amount being backed up, your Internet bandwidth (take the speed test to find out how you rate), the speed of your hardware, and your online storage provider. For example, 150GB would commonly take around 7-8 days, though that could vary widely as some providers, like Carbonite, throttle your upload speeds.
Start filing
Now it’s time to begin your digital filing.
Download statements
Start by going online and downloading all your monthly statements from banks, etc., as far back as you can access, and file them in the folders you created. Save everything in PDF format. For items not already in PDF form, such as a Web-based receipt of payment, use the “print” or “save as” command to create a PDF.
Going forward, make it a monthly habit to download and file statements from your online accounts and anything related to your household. There is not yet any way to automate that process, though most banks will send you an email notification when your statements are ready.
Scan papers
Start by scanning everything on your desk. Short-term things can go into a digital “Delete by” folder labeled by year. Tear apart multi-page documents so that they’ll go through the scanner – you’ll be throwing them away anyway. For bulky items that won’t fit through the feeder, use either your flatbed multi-function printer, or take a photo with your digital camera.
Work your way through your desk until it’s clean. Doesn’t that feel great? Over the next few months, start chipping away at your paper filing cabinet. You will discover that much of your file cabinet can be tossed outright. Don’t scan anything you can get online, like warranties, user manuals, policies, terms and conditions, brochures, etc. Be bold and ruthless, but don’t agonize – storage costs keep falling, so if you are in serious doubt, go ahead and scan it. Then drag your file cabinet curbside and put a sign on it marked “free”.
Shred
After scanning, shred sensitive documents. If you don’t want to purchase a shredder, check your town’s Website to see if they offer a free document shredding/recycling day, where you can take in your documents and watch them shredded before your eyes in an instant; most towns seem to have one.
What to keep in paper
Scan everything, but also store in paper form official certified documents and anything with a raised seal, such as notarized documents, deeds, wills, title documents, trust documents, birth/death certificates. Other candidates for paper are short-term items you want at your fingertips, like flyers, clippings, and catalogs. Or, keep your desk pristine by scanning those short-term notes into your “delete by” folder.
Ongoing maintenance
Now that everything is in your digital filing cabinet, just keep up the ongoing maintenance:
- Periodically check your backup solution to make sure it is working.
- Monthly – download all online statements related to your household.
- Weekly – scan in documents that you want to keep and keep your inbox pile small.
- Keep your PC healthy and updated, since it is now the hub of your filing.
Enjoy your newly paperless house!
This article was written by Kristy Holch and originally appeared on Techlicious.
More from Techlicious: